

Intex Pool Set Up Instructions: A Comprehensive Guide
Considering an Intex pool? Users discuss options like Intex 66724 and Decathlon alternatives‚ noting comfort and space-saving benefits․ Proper setup‚ including ground preparation‚ is key for a successful experience․
Unboxing and Inventory
Begin your Intex pool journey with a meticulous unboxing process․ Carefully open the packaging‚ avoiding any sharp objects that could damage the pool liner or frame components․ A thorough inventory is absolutely crucial before proceeding․ Cross-reference all included parts against the manufacturer’s checklist – typically found within the instruction manual․
Expect to find the pool liner‚ the metal or plastic frame pieces‚ the filter pump system (often packaged separately)‚ hoses‚ clamps‚ and potentially a repair kit․ Pay close attention to the number of frame supports‚ connectors‚ and leg pieces․ Users have noted that discrepancies‚ though rare‚ can cause significant delays later in the setup․
Document any missing or damaged parts immediately by taking photos and contacting Intex customer support․ Don’t attempt to substitute parts or proceed with assembly if something is missing․ Proper organization of the components will streamline the subsequent steps‚ making the entire setup process far more manageable․ A clear workspace is also essential for efficient inventory and assembly․
Choosing the Right Location
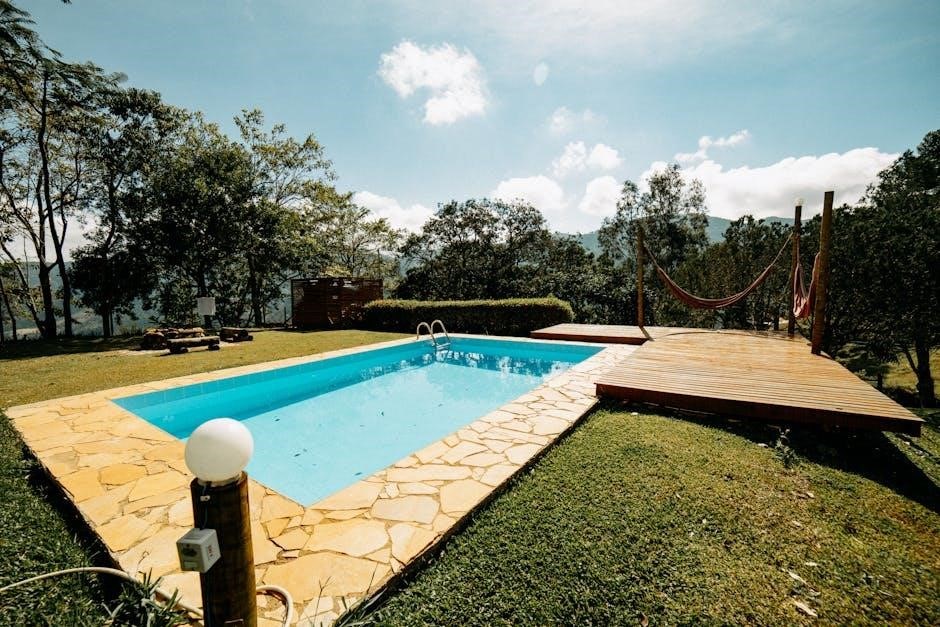
Selecting the ideal spot for your Intex pool is paramount for both safety and longevity․ Prioritize a level surface; even a slight incline can create uneven water distribution and stress the frame․ Avoid locations directly under trees‚ as falling leaves and debris will contaminate the water and increase maintenance․ Consider proximity to a power source for the filter pump – extension cords should be used cautiously and be outdoor-rated․
Ensure the chosen area is free from underground utilities like pipes or cables․ Check with your local authorities if you’re unsure․ Accessibility for filling and draining is also vital; a nearby water source will save considerable effort․ Think about sun exposure – a sunny location will warm the water naturally‚ but also consider providing some shade to prevent excessive algae growth․
Furthermore‚ consider the pool’s proximity to your house․ Convenience is key‚ but also factor in potential noise from the pump and increased foot traffic․ A location that offers both practicality and a pleasant swimming environment is the ultimate goal․
Preparing the Ground
Thorough ground preparation is crucial to prevent damage to your Intex pool liner and ensure stability․ Begin by removing all rocks‚ sticks‚ roots‚ and any other sharp objects from the designated area․ Even small stones can puncture the liner․ Next‚ level the ground as precisely as possible․ A slight imperfection can be addressed with sand‚ but significant slopes require more extensive work․
A layer of sand‚ approximately 2-3 inches thick‚ is highly recommended․ This provides a cushioned base and helps to distribute weight evenly․ Compact the sand firmly using a hand tamper or roller․ Alternatively‚ a ground cloth or tarp specifically designed for pool use can be placed over the prepared ground to offer an extra layer of protection․

Avoid using gravel‚ as it doesn’t provide a smooth surface and can also cause punctures․ Remember‚ a well-prepared base is an investment in the longevity of your pool․ Taking the time to do this step correctly will save you headaches and potential repair costs down the line․
Assembling the Pool Frame
Carefully unpack all frame components and verify that all parts are present according to the manufacturer’s instructions․ Begin by connecting the base rails‚ ensuring they snap securely into place․ These form the foundation of the pool’s structure․ Next‚ assemble the uprights‚ attaching them to the base rails at each corner and along the sides‚ following the designated slots or connectors․
Once the uprights are in position‚ connect the top rails to complete the frame․ These rails typically clip or screw onto the uprights‚ creating a rigid‚ circular or rectangular structure․ Double-check all connections to ensure they are tight and secure․ A wobbly frame can compromise the pool’s integrity and lead to potential collapse․
It’s often helpful to have a second person assist with this step‚ especially for larger pools․ Ensure the frame is level before proceeding to the next stage․ Minor adjustments can be made by slightly shifting the uprights․ A stable and correctly assembled frame is essential for safely supporting the pool liner and water․
Installing the Liner
With the frame securely assembled‚ carefully unfold the pool liner and spread it out over the frame․ Ensure the liner is centered‚ leaving an equal amount of material extending beyond the frame on all sides․ This excess liner will be secured to the frame later․
Begin smoothing out any wrinkles or creases in the liner‚ working from the center outwards․ Avoid stretching the liner excessively‚ as this can cause it to tear or become damaged․ Gentle smoothing is key․ As you smooth‚ gradually tuck the liner under the top rail of the frame‚ securing it in place with the provided clips or clamps․
Work your way around the entire pool‚ ensuring the liner is evenly distributed and securely fastened․ Pay close attention to corners and curves‚ as these areas are prone to wrinkles․ Once the liner is fully installed‚ double-check all connections to ensure a watertight seal․ A properly installed liner is crucial for preventing leaks and maintaining water quality․
Filling the Pool with Water
Before initiating the filling process‚ re-inspect the liner for any remaining wrinkles or imperfections․ Gently adjust as needed‚ ensuring a smooth and even surface․ Begin filling the pool with water using a garden hose‚ directing the flow onto the liner to avoid direct impact on the frame․
As the water level rises‚ continue to monitor the liner‚ smoothing out any new wrinkles that may appear․ It’s beneficial to fill the pool incrementally‚ pausing periodically to adjust the liner and ensure it remains properly positioned․ Avoid overstretching the liner during this phase․
Fill the pool to approximately one inch below the skimmer opening․ This allows for proper skimmer function and prevents water from overflowing․ Once filled‚ allow the liner to settle for several hours before adding chemicals or activating the filter pump system․ This settling period helps to minimize wrinkles and ensures a stable base for water treatment․

Setting Up the Filter Pump System
Locate the designated areas for the filter pump and hoses‚ ensuring they are on a level surface and protected from direct sunlight․ Carefully connect the hoses to the filter pump inlet and outlet ports‚ following the manufacturer’s instructions․ Secure all connections with clamps to prevent leaks․
Connect the inlet hose to the pool’s drain fitting‚ typically located near the bottom of the pool wall․ The outlet hose should be directed back into the pool‚ ideally near the surface to promote water circulation․ Before plugging in the pump‚ prime it by filling it with water to ensure proper operation․
Once primed‚ plug the filter pump into a grounded electrical outlet․ Verify that the pump is functioning correctly and that water is circulating through the system․ Regularly inspect the filter cartridge and clean or replace it as needed to maintain optimal filtration efficiency․ Proper pump setup is crucial for clean and safe pool water․
Water Chemistry Basics
Maintaining proper water chemistry is paramount for a safe and enjoyable swimming experience․ Key parameters include pH‚ alkalinity‚ and sanitizer levels (chlorine or bromine)․ pH measures acidity/alkalinity‚ ideally between 7․2 and 7․8․ Alkalinity acts as a pH buffer‚ generally maintained between 80-120 ppm․
Sanitizers kill bacteria and algae․ Chlorine is common‚ requiring levels of 1-3 ppm․ Regularly test your water using a test kit or strips․ Adjust chemicals carefully‚ following product instructions․ Always add chemicals to water‚ never water to chemicals;
Calcium hardness‚ though less frequently tested‚ prevents corrosion or scaling․ Cyanuric acid (stabilizer) protects chlorine from sunlight degradation․ Understanding these basics‚ and consistent testing‚ ensures a healthy and sparkling pool․ Ignoring water chemistry can lead to algae blooms‚ skin irritation‚ and equipment damage․
Maintaining Proper Water Balance
Consistent water balance builds upon the water chemistry basics‚ ensuring long-term pool health and swimmer comfort․ Regular testing – ideally 2-3 times weekly – is crucial․ Monitor pH‚ alkalinity‚ calcium hardness‚ and sanitizer levels diligently․ Small‚ incremental adjustments are preferable to large swings․
Low pH can cause corrosion of metal components and eye irritation․ High pH reduces sanitizer effectiveness․ Alkalinity stabilizes pH‚ preventing drastic fluctuations․ Calcium hardness prevents etching of plaster surfaces and corrosion․ Maintaining these levels prevents costly repairs and ensures a pleasant swimming experience․
Consider using a water balancing calculator to determine the correct chemical dosages․ Shocking the pool weekly (or after heavy use) helps eliminate combined chlorine and organic contaminants․ Proper circulation and filtration are also vital for maintaining balance․ Remember‚ balanced water protects your investment and promotes swimmer well-being․
Cleaning the Pool
Regular cleaning is paramount for a sparkling and hygienic Intex pool․ Begin with daily skimming to remove leaves‚ insects‚ and other surface debris․ This prevents staining and reduces the load on your filtration system․ Vacuum the pool floor at least once a week‚ or more frequently if needed‚ to eliminate settled dirt and algae․
Pay attention to the pool walls; brushing them helps dislodge algae and prevents buildup․ Clean the filter pump system regularly‚ following the manufacturer’s instructions․ A clogged filter reduces water circulation and filtration efficiency․ Consider using a pool cover when the pool is not in use to minimize debris accumulation․
For stubborn stains or algae blooms‚ specialized pool cleaning chemicals may be necessary․ Always follow product instructions carefully․ Maintaining proper water chemistry‚ as discussed previously‚ significantly reduces the need for extensive cleaning․ Consistent cleaning not only enhances the pool’s appearance but also safeguards water quality and extends the lifespan of your equipment․
Winterizing Your Intex Pool
Proper winterization protects your Intex pool from damage during freezing temperatures․ Begin by thoroughly cleaning the pool and balancing the water chemistry․ Lower the water level below the skimmer opening‚ but above the return jets․ Disconnect all hoses and equipment‚ including the filter pump‚ heater (if applicable)‚ and chlorinator․
Drain all water from the pump‚ filter‚ heater‚ and plumbing lines to prevent freezing and cracking․ Use a shop vacuum to blow out any remaining water․ Remove and store the filter cartridge or sand․ Install winterizing plugs in the return jets and skimmer opening․ Cover the pool with a winter cover‚ securing it tightly to prevent debris accumulation and ice formation․
Consider using an air pillow under the cover to help distribute the weight of snow and ice․ Regularly check the cover throughout the winter to ensure it remains secure․ Storing all components indoors in a dry place will further protect them from the elements‚ ensuring a smooth setup next season․
Troubleshooting Common Issues
Encountering problems with your Intex pool? A common issue is a cloudy pool‚ often caused by improper water chemistry or a dirty filter․ Regularly test and adjust pH‚ alkalinity‚ and sanitizer levels․ Backwash or clean the filter frequently․ Leaks can occur at connections; ensure all hoses are securely fastened․
Pump failures might stem from clogs or electrical issues․ Check for obstructions and ensure proper voltage․ If the pump isn’t priming‚ add water to the system․ Liner wrinkles can develop during filling; attempt to smooth them out with a pool brush or by carefully adjusting water levels․ Noise concerns‚ like friction on wooden floors with Intex airbeds‚ can be mitigated with a protective layer․

For more significant issues‚ consult the Intex manual or contact customer support․ Remember that proper maintenance‚ like regular cleaning and winterization‚ prevents many problems․ Addressing issues promptly prevents escalation and extends the life of your pool․
Intex Pool Safety Guidelines
Prioritizing safety around your Intex pool is paramount․ Constant‚ active supervision is crucial‚ especially with children․ Never leave children unattended near the pool‚ even for a moment․ Install a secure barrier‚ like a fence‚ around the pool area to prevent unauthorized access․ Learn CPR and keep rescue equipment readily available․
Educate all pool users about pool safety rules․ Avoid running or roughhousing near the pool’s edge․ Discourage diving in shallow areas․ Be mindful of electrical safety – keep electrical devices away from the water․ Regularly inspect the pool structure and equipment for damage․
Properly store chemicals out of reach of children and pets․ Understand the risks associated with pool toys and ensure they are used responsibly․ Consider pool alarms for added security․ Remember‚ a safe pool environment requires vigilance and proactive measures to prevent accidents․
Understanding Different Intex Pool Types
Intex offers a diverse range of pools to suit various needs and spaces․ From smaller‚ easy-set pools ideal for limited areas to larger‚ rectangular frame pools providing ample swimming space‚ understanding the options is key․ Easy-set pools inflate with an air pump and require minimal assembly‚ making them a quick setup solution․
Frame pools utilize a metal frame for added stability and durability‚ often requiring more involved assembly․ Ultra X Frame pools represent a step up in construction‚ offering enhanced strength and longevity․ Consider the pool’s depth and size in relation to your yard and intended use․
Intex also provides options like inflatable pools with built-in benches or features․ When choosing‚ factor in storage requirements during the off-season․ Understanding the differences in construction‚ size‚ and features will help you select the Intex pool that best fits your lifestyle and setup preferences․
Intex Airbed Usage in Conjunction with Pools
Many Intex users appreciate the convenience of combining pool time with relaxation on an Intex airbed․ However‚ careful consideration is needed to ensure safety and prevent damage․ Users have compared various Intex models‚ like the 66724‚ noting differences in firmness and stability – crucial for comfortable lounging․
When using an airbed near a pool‚ always maintain a safe distance to avoid accidental falls or water damage․ Sharp objects around the pool area pose a risk of punctures‚ so clear the surrounding space․ Consider the airbed’s weight capacity and ensure it’s appropriate for the number of users․
Some users prefer manual or electric pumps for quick inflation․ While electric pumps are convenient‚ others suggest manual options to avoid potential issues․ Remember to properly store the airbed when not in use‚ protecting it from sun exposure and sharp objects to prolong its lifespan․ Combining an Intex pool with an Intex airbed enhances the overall recreational experience․
Comparing Intex to Decathlon Pool Options

When choosing a pool‚ many consider both Intex and Decathlon as viable options․ Discussions often revolve around price‚ durability‚ and overall value․ Decathlon pools‚ particularly their 4․1m models‚ are frequently compared to Intex alternatives‚ with users weighing the pros and cons of each brand․
Decathlon offers pools with varying warranty periods – 10 years versus 2 years – impacting purchase decisions․ Some users report recent quality concerns with the 2-year warranty models‚ prompting caution․ Intex pools are generally considered more affordable‚ making them accessible to a wider range of budgets․
Regarding setup‚ both brands require careful ground preparation․ Users share experiences with Intex airbeds alongside these pools‚ highlighting the importance of a level surface․ Ultimately‚ the best choice depends on individual needs‚ budget constraints‚ and desired longevity․ Considering user reviews and warranty details is crucial for informed decision-making․
Addressing Noise Concerns with Intex Pools
A common concern with Intex pools‚ and inflatable structures in general‚ is noise generation․ Users have noted that Intex airbeds‚ when used on certain surfaces like wood flooring‚ can create friction sounds․ This can be particularly noticeable during movement or temperature changes‚ potentially disrupting relaxation․
While not directly related to the pool itself‚ the pump system can also contribute to noise․ Selecting a quieter pump model and ensuring proper installation can mitigate this issue․ Additionally‚ the material of the pool liner can generate sounds as it expands and contracts with temperature fluctuations․
To minimize noise‚ consider placing a protective layer between the pool and the ground․ Utilizing a pool pad or carpet can dampen vibrations and reduce friction․ Regular maintenance‚ such as ensuring the pump is securely mounted‚ can also help․ Addressing these factors will contribute to a more peaceful pool experience․
Storage and Maintenance of Pool Components
Proper storage and maintenance are crucial for extending the life of your Intex pool and its components․ Users emphasize the vulnerability of inflatable products to punctures from sharp objects‚ highlighting the need for careful handling during both use and storage․
When disassembling the pool‚ thoroughly clean and dry all parts – the liner‚ frame‚ and pump – before storing․ Fold the liner loosely to avoid creases that could weaken the material․ Store components in a cool‚ dry place‚ away from direct sunlight and extreme temperatures․ The pump should be protected from moisture and dust․
Regularly inspect the liner for any signs of damage and repair them promptly with a patching kit․ The frame should be checked for corrosion or bending․ Proper winterization‚ including complete draining and secure storage‚ is essential in colder climates․ Following these steps ensures your Intex pool remains in optimal condition for years to come․